ATmega USB Bit Whacker
A Complete Forth System!
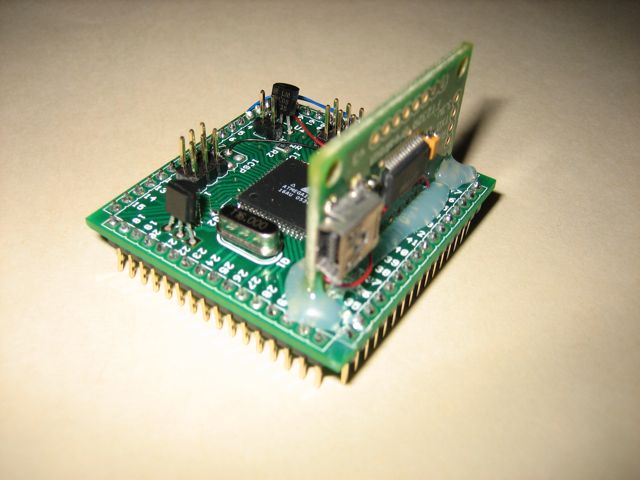
These boards are from sparkfun.
Header Board for ATMega128 (sku: DEV-00035) and Breakout Board for FT232RL USB to Serial (sku: BOB-00718).
Remove the FT232RL solder jumper at SJ1 and wire VCCIO to VCC (USB is +5V).
FT232 Pin 1 TXD to ATMEGA128 pin 2.
FT232 Pin 5 RXD to ATMEGA128 pin3.
Power ATMEGA128 from USB +5V and GND.
Add a FTDI USB interface to an ATmega running amforth.
Build amforth for ATmega128. This requires AVRASM2, which comes with AVR Studio.
Here are directions for building amforth for the ATMega128 using a Mac.
You could use avra instead of AVR Studio.
Here are some examples for using amforth on the ATMega128.
The Python uploader that is distributed with amforth is described here.
I rewrote the uploader to provide error reports and to allow interacting with the ATmega from the same program before and after uploading.
My uploader : ftdi_amforth.py, an amforth shell.
I figured out the prompt match sequences by running ftdi_pexpect.py :
In [18]: s.open()
In [31]: s.write("cold\n")
In [32]: s.readline()
Out[32]: 'cold\r\n'
LOOK FOR THIS SEQUENCE:
In [33]: s.read()
Out[33]: ' '
In [34]: s.read()
Out[34]: '?'
In [35]: s.read()
Out[35]: '?'
In [36]: s.read()
Out[36]: '\x00'
In [37]: s.read()
Out[37]: ' '
END OF ERROR SEQUENCE MATCH:
In [38]: s.read()
Out[38]: '-'
In [40]: s.readline()
Out[40]: '13 10 \r\n'
NEXT PROMPT:
In [41]: s.read()
Out[41]: '>'
In [42]: s.read()
Out[42]: ' '
In [43]: s.read()
Out[43]: ''
ATmega USB Bit Whacker
The ATmega running forth provides an interpreter. This interpreter talks to a Python application running on the USB host.
Separating the USB to asynchronous serial FT232RL from the ATmega allows placing the FTDI interface at the computer and placing the
I/O some distance away using either RS232 or RS485 signaling.
Controlling this remote I/O is easily done with Python + pyserial + pexpect.
pyserial and pexpect are easily installed with easy_install.
Here is a different approach to USB I/O: USB Bit Whacker.